SharePoint Online webhook implementation using Azure Functions - part 1
The goal of this series of posts is to show an implementation of a real world scenario of a webhook in SharePoint Online, as an alternative to remote event receivers, to allow developers to receive notifications on specific events. The architecture will be a variation of the one showed in the PnP Webcast - Introduction to SharePoint Webhooks.
SharePoint Online webhook implementation using Azure Functions - part 1 (this post)
SharePoint Online webhook implementation using Azure Functions - part 2
The scenario is :
- A user upload an image in a document library
- A webhook is triggered and a notification is sent to an Azure Function
- The Azure Function acknowledged the notification and put it in a Service Bus Queue
- Another Azure function is triggered when an item is added to the Service Bus Queue
- The second Azure function read the notification, retrieve the image, and send it to Azure Cognitive Services in order to get a description of the image
- The second Azure function write back the description of the image in SharePoint
You will need a SharePoint Online wewbsite and a document library as a prerequisite. The full code is available on GitHub.
Webhook subscription
At the time of the article, you can subscribe to a webhook only at a list level in SharePoint Online (a document library or a list). You do that by sending a the following HTTP POST request.
URL : https://<SP_WEB_URL>/_api/web/lists('<LIST_GUID>')/subscriptions
Headers:
Content-Type: application/json
With the following body :
{
  "resource": "https://<SP_WEB_URL>/_api/web/lists('<LIST_GUID>')",
  "notificationUrl": "https://<AZURE_FUNCTION_URL>",
  "expirationDateTime": "2017-12-01T15:00:00+00:00"
}
As you see, we need the URL of the Azure Function which will handle the webhook notifications. After creating a Function App, add an Azure Function using the HttpTrigger - C# template and Function as authorization level (mine will be called func-webhook ). This function will be responsible to validate the subscription creation, and then to handle webhook notifications. It must respond in less than five seconds, so it’s recommended to process the webhook asynchronously. That’s why I’ll putting the webhook notification in a Service Bus Queue and process it later with another function (part 2). When creating a subscription, SharePoint will send a notification to our function containing a Validation Token in the query string. You have to send a HTTP 200 OK response with the Validation Token as shown below.
public static async Task<HttpResponseMessage> Run(HttpRequestMessage req, TraceWriter log)
{
    log.Info("Incoming notification");

    // Get Validation Token
    string validationToken = req.GetQueryNameValuePairs()
        .FirstOrDefault(q => string.Compare(q.Key, "validationtoken", true) == 0)
        .Value;

    // Response to SharePoint including the validation token
    if (validationToken != null)
    {
        log.Info($"Validation token {validationToken} received");
        var response = req.CreateResponse(HttpStatusCode.OK);
        response.Content = new StringContent(validationToken);
        return response;
    }

    return new HttpResponseMessage(HttpStatusCode.OK);
}
Grab the function URL using the </>Get function code link at the top right corner of the editor. It should looks like :
https://<FUNC_APP_SERVICE_NAME>.azurewebsites.net/api/func-webhook?code=<FUNCTION_KEY>
You should have everything you need to create the subscription. You can send the HTTP Request using Postman. You can check if the subscription work by adding a file in your document library and by looking at the logs of the Azure Function.
Adding notifications to a Service Bus Queue
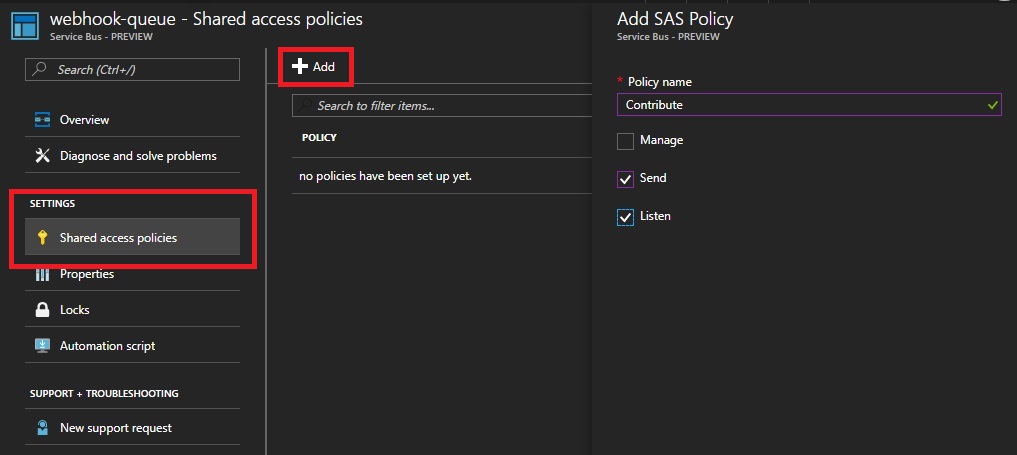
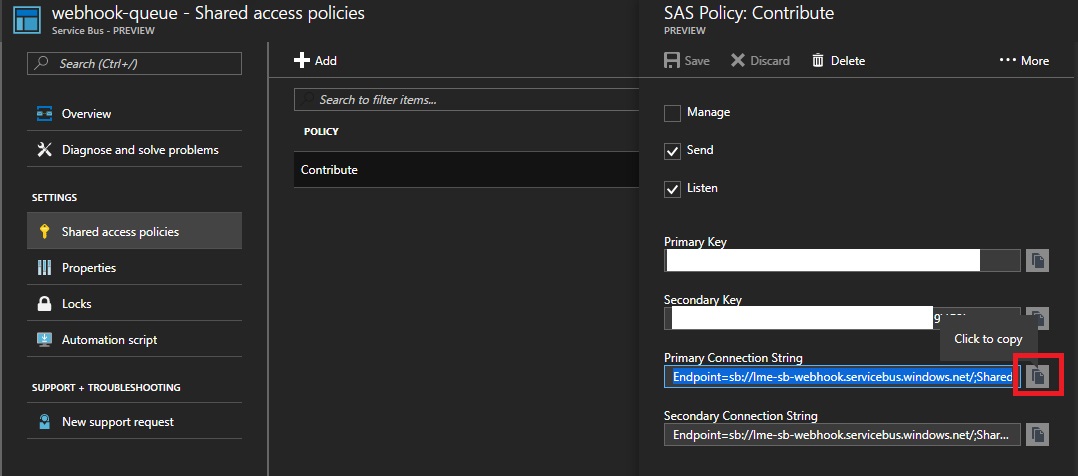
Now that we receives notifications, we can add them to a Service Bus Queue in order to process them asynchronously. First, create a Service Bus in Azure, then Add a Queue using default settings, and finally, create a Shared Access Policy for the Queue and retrieve the Connection String.
Back to your Azure Function, add the ServiceBus Nuget package to the Azure Function by adding a project.json file.
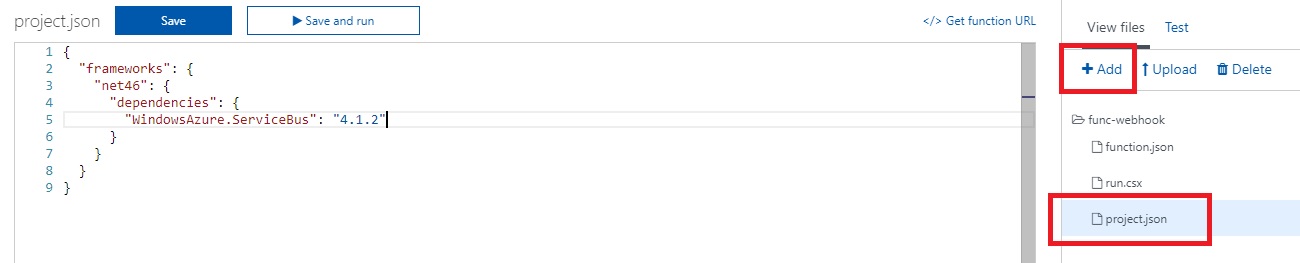
with the following content :
{
  "frameworks": {
    "net46": {
      "dependencies": {
        "WindowsAzure.ServiceBus": "4.1.2"
      }
    }
  }
}
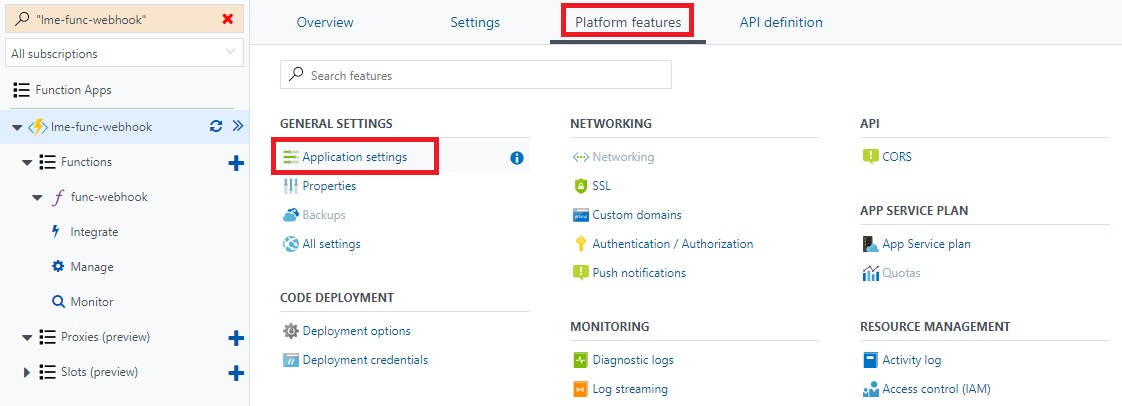
Click Save. Go to the Application Settings of your Function App Service and add the connection string of the Queue to an environment variable connStr_WebHookQueue in the App Settings section.
The last step is to update the Azure Function code to add the notification to the Queue. Don’t forget to add the Microsoft.ServiceBus.Messaging namespace in the using section. This is the full code of the function :
using System.Net;
using Microsoft.ServiceBus.Messaging;

public static async Task<HttpResponseMessage> Run(HttpRequestMessage req, TraceWriter log)
{
    log.Info("Incoming notification");

    // Get Validation Token
    string validationToken = req.GetQueryNameValuePairs()
        .FirstOrDefault(q => string.Compare(q.Key, "validationtoken", true) == 0)
        .Value;

    // Response to SharePoint including the validation token
    if (validationToken != null)
    {
        log.Info($"Validation token {validationToken} received");
        var response = req.CreateResponse(HttpStatusCode.OK);
        response.Content = new StringContent(validationToken);
        return response;
    }

    var content = await req.Content.ReadAsStringAsync();
    log.Info($"Received following payload: {content}");

    var connStr = System.Environment.GetEnvironmentVariable("connStr_WebHookQueue");
    var client = QueueClient.CreateFromConnectionString(connStr);
    var message = new BrokeredMessage(content);
    client.Send(message);

    return new HttpResponseMessage(HttpStatusCode.OK);
}
You can test the code by adding a file in the document library, and then checking in the Azure Portal if an item has been added to the Queue.
Next
In (part 2), we will implement our second Azure Function triggered when an item is added to the Queue. The function will ask SharePoint for the changes, download the image, analyze it with Cognitive Services, and then write back a description in SharePoint.